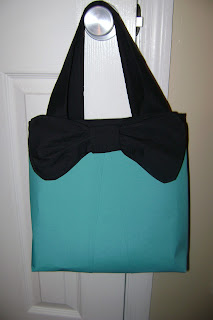
I thought I would challenge myself with a sewing project. I certainly challenged myself with this one. I have never attempted a sewing project with so many parts and so many new materials and processing that I was unfamiliar with. However, I am super excited to say that even though this project was challenging, it was also very successful!
Inspiration
Supplies
- ½ a yard of fabric for the outer part
- ½ a yard for the inside
- ½ a year for the bow, stripe, and straps
- 2 yards of fusible interfacing
- 1 magnetic snap (optional. I used a button and ribbon)
- coordinating thread
Cut your 1/2 a yard fabric for the outer part of the bag in half. Take one piece and make a one inch pleat in the middle and pin in place.
Fold your pleated fabric in half. Use the template from the inspiration blog to cut the front part of the bag. Do the same with the other piece of fabric which will be the back of the bag.
Iron on your interfacing to both sides of the outer part of the bag. This will give it stability and structure.
Now, cut out the top stripe from your coordinating fabric using the template. Iron your interfacing on. Lay it on top of your outer part of you bag. Stitch in place.
Flip the stripe up right and top stitch it. Do the same for the other side.
Lay the front and back parts on top of each other with right sides together. Stitch around the sides and the bottom of the bag.
Take a corner and flatten it together. Stitch a seam about 2.5 inches from the tip. Do the same to the other corner. Cut the excess. This will box the bottom of the bag.
Now, you have the outer portion done.
For the bow, cut a piece of fabric 12 inches long by 6 inches wide. Also cut a piece 6 inches long by 2.5 inches wide. Take your 12"x6" fabric nd lay it right sides together. Sew around the perimeter. Leave a small hole to invert it. Now top stitch around it and close up the hole. Do the same thing with the 6"x2.5" piece. Then, sew the two pieces together to make a loop. Slide the 12"x6" piece through the loop. Attach the bow to the front of the bag with a few stitches under the loop part.
Now cut two pieces of fabric to make your inside pocket. Stitch the perimeter, invert it and top stitch the top of it. Use the template to cut out the lining. Attach the pocket to one piece of lining.
Lay the lining fabric pieces together with the pocket inside. Sew around the edges leaving the top open.
Attach your snap or button or whatever closure you want.
Cut out your straps. I cut mine 20" long by 2" wide. You'll need four pieces. I used interfacing to give them more stability. Lay two pieces right sides together and sew the edges. Invert it. Do the same to the other two pieces. Attach them to the putter part of the bag.
Insert the lining and top stitch around the top of you bag. Now you're done!


No comments:
Post a Comment